
- Home
-
Electrical equipment
-
Sockets and switches
- Bticino
- Legrand
- Hager
- Schneider Electric
- Jung
-
Modelec
-
Collection Confidence
-
Confidence screw collection
- Narrow Confidence facades
- Narrow Confidence facades with screws
- Long, narrow Confidence facades
- Narrow, long Confidence facades with screws
- Narrow, long Confidence cabinet fronts with reading lights
- Narrow, long Confidence cabinet fronts with spotlights
- Simple mechanisms for Confidence facades
- Reinforced mechanisms for Confidence facades
- Reinforced mechanisms for narrow Confidence facades
- Reinforced mechanisms for narrow, long Confidence facades
-
Collection Desir
-
Collection Fascination
-
Collection Hitera
-
Iris Collection
-
Collection Karo
-
Collection M
- Narrow mechanisms
-
Collection Confidence
- Vandal-proof equipment
- Iboco fittings
-
Lighting
-
Interior lighting
-
Wall lights
-
LED strip
-
Downlights
-
Recessed spotlights
-
Surface-mounted spotlights
- Lamps
- Rod-mounted spotlights
- LED panels
-
Suspensions
-
Ceiling lights
-
Track and spotlights track lighting
- Tensioned cable
- Waterproof lighting
- Connected lamps
- Portholes
- Bathroom rulers
- Table lamps
- Panel lighting
- Headboard reading lights
- Light mirror
-
Wall lights
- Outdoor luminaires
- LED bulbs and spotlights
- Special lamps
- Lighting accessories
-
Interior lighting
-
Home security
-
Heating and sanitary
- Heating
-
Individual ventilation
-
Self-adjusting CMV
-
Humidity-sensitive CMV
- Insufflation ventilation
- Double-flow ventilation
- Wall-mounted aerator
- Duct puller
- Ventilation accessories
- Extractors and blowers
- Ventilation grilles
- Flow control
- Roof outlet
- Ventilation box
-
Ventilation duct
- Ventilation sleeve and reducer
- Sound trap
- Ventilation filters
-
Self-adjusting CMV
- Central vacuum
-
Connected home
- Ideas & Advice
-
MenuBack
-
Products
-
-
-
Electrical panel
- Bridging bars, combs
-
Electrical protection
- Differential block
- Earth leakage circuit breakers
-
Earth leakage switches
- 40A ground-fault circuit interrupter
- 63A ground-fault circuit interrupter
- ABB ground fault circuit interrupter
- AC-type ground fault circuit interrupter
- Eaton ground-fault circuit interrupter
- Hager ground-fault circuit interrupter
- Legrand ground fault circuit interrupter
- Schneider residual current circuit breaker
- Siemens ground-fault circuit interrupter
- Type A ground-fault circuit interrupter
- Fuses and fuseholders
- Grounding
- Lightning arresters and surge protectors
- Main circuit breaker
-
Modular circuit breakers
- 10A circuit breakers
- 16A circuit breakers
- 20A circuit breakers
- 32A circuit breakers
- ABB circuit breakers
- Circuit breakers Schneider Electric
- D-curve circuit breakers
- Eaton circuit breakers
- Four-pole circuit breakers
- Hager circuit breakers
- Legrand circuit breakers
- Siemens circuit breakers
- Three-phase circuit breakers
- Molded case circuit breaker
- Energy management
- Modular accessories
- Modular equipment
-
-
-
-
-
Interior lighting
- Bathroom rulers
- Ceiling lights
- Connected lamps
- Downlights
- Headboard reading lights
-
Interior lighting
- Bathroom rulers
- Ceiling lights
- Connected lamps
- Downlights
- Headboard reading lights
- Lamps
- LED panels
- LED strip
- Light mirror
- Panel lighting
- Portholes
-
Recessed spotlights
- Aric
- Arkoslight
- Europole
- Faro Barcelona
- Indigo Lighting - Collingwood
- Ledvance
- Paulmann
- Philips
- SG Lighting
- SLV
- Switch Lite
- Rod-mounted spotlights
- Surface-mounted spotlights
- Suspensions
- Table lamps
- Tensioned cable
- Track and spotlights track lighting
- Wall lights
- Waterproof lighting
- Lamps
- LED panels
- LED strip
- Light mirror
- Panel lighting
- Portholes
-
Recessed spotlights
- Aric
- Arkoslight
- Europole
- Faro Barcelona
- Indigo Lighting - Collingwood
- Ledvance
- Paulmann
- Philips
- SG Lighting
- SLV
- Switch Lite
- Rod-mounted spotlights
- Surface-mounted spotlights
- Suspensions
- Table lamps
- Tensioned cable
- Track and spotlights track lighting
- Wall lights
- Waterproof lighting
-
-
-
Outdoor lighting
- Exterior wall lights
- Bollards and lampposts
- Outdoor recessed
- Mobile luminaires
- Projectors
- Outdoor suspensions
- Outdoor ceiling lights
- Spotlights sign
- Solar luminaires
-
Lights and garlands
- Comet garlands
- Stalactite garlands
- Connectable festoons
- Spotlights and patterns
- Classic garlands
- Curtain lights
- Motifs
- Illuminated fir trees
- Luminous balls and animals
- Guinguette garland
- Garlands Bulbs B22
- Garlands Bulbs E27
- Garlands E14 bulbs
- LED connection cable
- Professional decorations
- Garland accessories
- Outdoor illuminated furniture
- Submersible luminaires
-
-
-
-
-
Guide: how to install a smart switch

This practical guide walks you through the process step by step to help you safely install a smart switch: identify the wires, make the electrical connections, and then set up the Wi-Fi network. Be careful and always turn off the power supply before working on an electrical panel or device, such as a switch, outlet, or light fixture.
Contents
- Preparing to install a smart switch
- Secure the circuit before disassembly
- Check the hardware and compatibility
- Add a wireless remote control
- Connect the switch wires
- Identify the live wire, the neutral wire, and the lamp return wire
- Wiring a single-pole switch or a two-way switch
- Reinstall the equipment safely
- Set up home automation and the smart switch
- Pair the switch with Wi-Fi
- Controlling the lighting after configuration
- Choose a compatible product line
Preparing to install a smart switch
Replacing a wall switch with a smart model requires careful preparation. Before beginning any work, gather the right tools, verify that the existing wiring is compatible, and secure the electrical circuit.
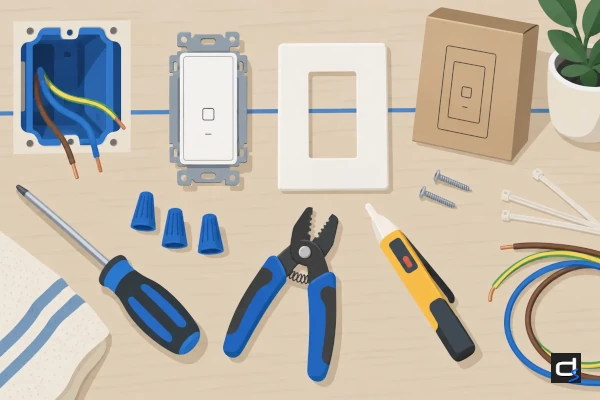
Secure the circuit before disassembly
To install a smart switch, you must first turn off the main power at the electrical panel before touching any wires. Once the circuit breaker is turned off, use a voltage tester to verify that there is no current in the wires: this check eliminates any risk of electric shock, even on a circuit you believe to be de-energized. Make sure that no one can turn the circuit breaker back on while work is being performed.
- Use a phillips or flathead screwdriver, depending on the type of screws used to secure your existing light switch.
- Voltage tester—essential for verifying the absence of current before handling the conductors.
- Stripping pliers for removing insulation from the ends of wires without damaging the conductor.
- Wire connectors (domino or Wago type) for securely connecting wires to each other after installation.
Next, remove the wall plate from the old switch, unscrew the mounting screws, and carefully pull the mechanism out of its box. Before unplugging anything, take a photo of the existing wiring or label each wire: this simple precaution prevents any confusion when connecting the new appliance, especially in older installations where the live and neutral wires do not always follow standard markings.
Check the hardware and compatibility
A Wi-Fi-enabled light switch operates on the 2.4 GHz band: the first factor to consider when choosing a model is to verify that your Internet router is broadcasting this network and that the signal is stable where the switch will be installed. Some devices also use Zigbee 3.0, a wireless protocol that relies on a home automation hub rather than the router itself.
Depending on the layout of the home, the presence or absence of a neutral wire in the wall box determines which model to choose: some smart switches require this wire to function, while others do not. Always check the manufacturer's specifications and compare them with the wiring you observe after disassembly to avoid an unnecessary product return.
The depth of the recessed box is another factor to check, especially in thin walls. In practice, you should also check compatibility with your light fixtures: some smart dimmers only work with LED bulbs that the manufacturer has certified as compatible. Hager switches designed for smart home projects offer interchangeable mechanisms and plates within each product line, which helps prevent selection errors.
Add a wireless remote control
A battery-powered wireless switch can be added to the system without modifying the existing circuit. This type of additional control unit, which can be mounted on the wall or placed freestanding, transmits its commands via radio or through a micromodule integrated into the chosen home automation ecosystem. This is the best option when you need to add a second control point in a room without having to run new cables.
This simple solution is suitable as long as it is compatible with the existing gateway or hub. Some home automation starter kits come with a wireless controller and a receiver module included, which simplifies setup. Home automation and its applications They thus cover both wired and wireless connections, depending on the specific requirements of each home.
Connect the switch wires
Once the old mechanism has been removed from its box, connecting the new unit follows a specific procedure. It is crucial to correctly identify each wire before connecting anything: a mistake at this stage can damage the electronic module or cause a short circuit.
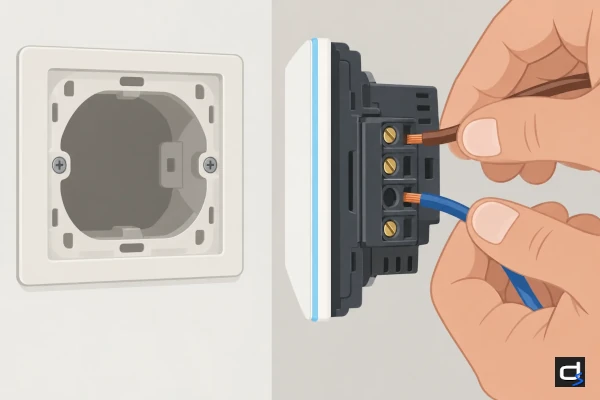
Identify the live wire, the neutral wire, and the lamp return wire
Before making any connections, you must interpret the wiring diagram for a wireless switch by taking into account the actual colors found in your junction box, since french installations predating the NF C 15-100 standard do not always follow current color codes. The phase wire is usually black and connected to terminal L; the lamp return wire is connected to terminal 1 in a standard lighting circuit.
- Phase (L terminal): typically a black wire that is constantly live and connected to the L terminal of the new switch.
- Lamp return (terminal 1): wire leading to the light fixture; connect to terminal 1 according to the manufacturer's diagram.
- Neutral: often a bundle of white wires folded back at the rear of the housing; required on certain connected models.
- Ground: green wire or bare copper wire; install according to the manufacturer's instructions and the existing wiring.
To identify the line wire in a two-point control system, briefly turn the circuit breaker back on after removing the mechanism, then test each terminal screw with a voltage detector. The driver who answers is the line. Immediately turn off the circuit breaker before proceeding with any electrical connections: this precaution is non-negotiable.
Wiring a single-pole switch or a two-way switch
In the first case, the connection is direct: the phase wire is connected to L, and the lamp return wire is connected to 1. In the second case, the smart switch is installed only in the box that contains the line wire and replaces the old mechanism on its own.
It is not recommended to install two connected switches to create this type of circuit: a single connected module and a standard switch as the second component are sufficient in most configurations.
| Type of circuit | Connected control point | Second point |
| Single-pole (single) | Single smart switch | None |
| Back and forth | Smart switch (line side) | Standard switch |
| 4-channel | Smart switch (line side) | Traditional mechanisms |
Reinstall the equipment safely
Once the connections are complete, carefully tuck the wires into the box, taking care not to pinch them, and then slide the mechanism into the recessed mounting. Align the mounting holes, tighten the screws evenly without applying excessive force, and make sure any curvature in the wall plate is pointing upward before snapping it into place or screwing it in. Improperly positioned equipment can interfere with the visibility of the controls.
Once reassembly is complete and the plate is in place, restore power to the electrical panel. A bare wire protruding from a junction box poses an immediate hazard until power is restored: do not restore power until you have completed the installation. The Wi-Fi setup can then begin, as the module is now powered on and ready to receive its network settings.
Set up home automation and the smart switch
Once the physical installation is complete, setting up the home automation system is the final step before you can control the lighting from a phone or tablet. In practice, it only takes a few minutes if your home Wi-Fi network is stable.
Pair the switch with Wi-Fi
Create an account in the app associated with your switch and log in before you start adding the device: most apps won't detect any modules until the user is logged in.
Pairing begins when the module enters pairing mode, which is usually indicated by a flashing light whose color varies by manufacturer. Next, start the process of adding a device in the app; the module will appear in the list of detected devices, and you simply need to select it to proceed to the network setup step. Communication takes place on the Wi-Fi band between 2.4 and 2.4835 GHz: a stable network at this location is essential for connecting the module.
- Flashing light: indicates that the module is in pairing mode and ready to be detected by the app.
- Enter Wi-Fi credentials: the credentials for the 2.4 GHz network must be entered in the app to connect the module.
- Indicator light status change: indicates that the module is establishing a connection to the home Wi-Fi network.
- Steady indicator light or confirmation in the app: indicates that setup was successful and that the switch is properly connected to the network.
Once the connection is confirmed, the switch is operational and can be controlled from the app. The exact meaning of the indicator lights is provided in the manufacturer's manual. Please note that some home automation ecosystems require you to first purchase a starter kit that includes a gateway in order to use additional wireless controls.
Controlling the lighting after configuration
To learn how to install a Legrand wireless switch or any other connected module and get the most out of it, explore the app’s features after setup: scenarios, schedules, dimming, and presence simulation are the most useful options for everyday use. This feature allows you to turn on the lights remotely to secure your home during a prolonged absence.
The physical push button remains fully functional after installation, without relying on a smartphone or the Internet. Commands can also be given by voice if the ecosystem is compatible with a voice assistant. The app also centralizes control of multiple connected devices, eliminating the need to switch between different interfaces depending on the type of device.
Choose a compatible product line
DomeaShop carries several Hager product lines designed for different applications: Essensya for standard residential installations, Gallery for decorative finishes in Pure, Night, Dune, or Titane colors, and Cubyko for home automation projects featuring KNX modules and an IP55 protection rating. The Ateha surface-mount series is designed for walls that are too thin for recessed installation, with the same IP55 rating, while the 1930 series is ideal for older homes seeking a retro style.
Depending on the level of protection required, the decision between a recessed series and a surface-mounted IP55 series may need to be made as early as the project design phase, particularly for a kitchen or bathroom. DomeaShop offers a full range of accessories and mounts to complete any installation—from single-station setups to multi-station configurations—allowing you to install mechanisms and faceplates that are compatible with your selected equipment.

Frequently asked questions
The domeashop store offers you a list of questions and answers corresponding to the most frequently asked questions related to the theme and products discussed in this article. If you can't find the answer you're looking for, contact us and our specialists will be happy to help.
Yes, provided you choose a battery-powered wireless switch that is compatible with the gateway or home automation ecosystem you already have installed. This additional control can be mounted on the wall or installed without any modifications to the electrical circuit. However, be sure to check the compatibility of the protocol—Wi-Fi, Zigbee, or another—before purchasing to avoid any incompatibility issues.
The phase wire, which is usually black, connects to the L terminal. The lamp return wire, which connects the switch to the light fixture, connects to terminal 1. The neutral wire—often a bundle of white wires folded back at the rear of the box—is required on certain connected models and connects to the N terminal, if present. The soil should be treated according to the manufacturer's instructions. Always refer to the instruction manual for the model you have chosen: terminal markings may vary from one manufacturer to another.
Create an account in the app associated with the switch and sign in before starting the pairing process. When the module's indicator light shows that it is in pairing mode, start the process of adding a device in the app. Select the detected module, then enter the credentials for your 2.4 GHz Wi-Fi network. The indicator light changes status while the connection is being established, then confirms that the connection was successful: the exact colors and signals are specified in the manufacturer's manual. The lighting can then be controlled from the app—using on/off, dimming, or scheduling modes.
In most cases, yes: the physical button remains functional locally, even if the Wi-Fi or Internet signal is lost. Installing a connected module never removes the standard manual control. However, remote functions, control from outside the home, automated scenarios, and presence simulation require an active network connection.
Turn off the power at the electrical panel and use a voltage tester to confirm that there is no power. Remove the panel and the existing mechanism, take a photo of the wiring, and then disconnect the wires. Next, connect the new switch by connecting the live wire to terminal L and the neutral wire to terminal 1, following the diagram provided in the manual. Reassemble the mechanism inside the box, secure the plate, reconnect the power, and start the Wi-Fi setup using the dedicated app.